
At PixelMe, we strongly advise you to embed a retargeting pixel in every link you share on social media 😃.
Why?
I’m sure you’re already sharing awesome content from other websites on your social media profiles.
While this keeps your profiles active, you might find yourself asking, “Does it help me bring more leads to my business?” Probably not. More likely, you’re just sending out a ton of free traffic to other cool sites.
However, embedding a retargeting pixel while sharing other people’s interesting content allows you to grow your own traffic and lists. We connect the dots between social media and marketing 😃.
Here is a step-by-step guide on how to use use PixelMe to embed retargeting pixels from key ad platforms like Facebook, LinkedIn, Twitter and Google AdWords – and create your own custom audience in the process.
Step 1: PixelMe sign-up & your free trial
Visit pixelme.me and sign up for a new account. We offer a 7-day free trial to every new sign up (you won’t even need to provide any credit card details!) – so you can enjoy the full power of PixelMe for free!
As soon as you reach your PixelMe Dashboard, click on the Audience Builder tab with the link icon 🔗 in the left-hand menu. Next, click on “Settings” at the top to view the Pixels tab.
The first step is to add all the retargeting Pixel IDs you want to use from each of your ad platforms.
When you add your pixels, you can give each of them a name that’s easy to remember. It will be easier to select them later when you shorten a new link.
In this guide, we will cover retargeting visitors with Facebook Ads. Notice that the setup is pretty similar on other ad platforms. (If you’re trying to find your pixel ID, click here.)
Now you’re ready to start embedding a retargeting pixel to every link you share!
Step 2: Shorten every link with PixelMe
In your Dashboard, you’re now ready to start shortening every link with your retargeting pixels included. You can include just one or all your retargeting pixels in every link. It’s up to you! 😃
To do this, just click on the ‘Create a link’ button in the upper right hand corner of your dashboard. Paste your destination URL, then add as many pixels as you’d like. You can also set your UTM parameters in this modal. Don’t forget to add your link to a campaign folder, so you can easily keep track of what you’re using the link for.
Now you can share your shortened URL on any platform you’d like 🎉. When people click on the link, Facebook identifies them (assuming they have a profile, of course) and then lets you turn those clicks into a custom audience! Even if the link isn’t leading to a page that you own.
Step 3: Share your PixelMe links on social media
Did you share your shortened URL? If so, then you should start seeing the number of clicks go up right away in your PixelMe dashboard 🚀.
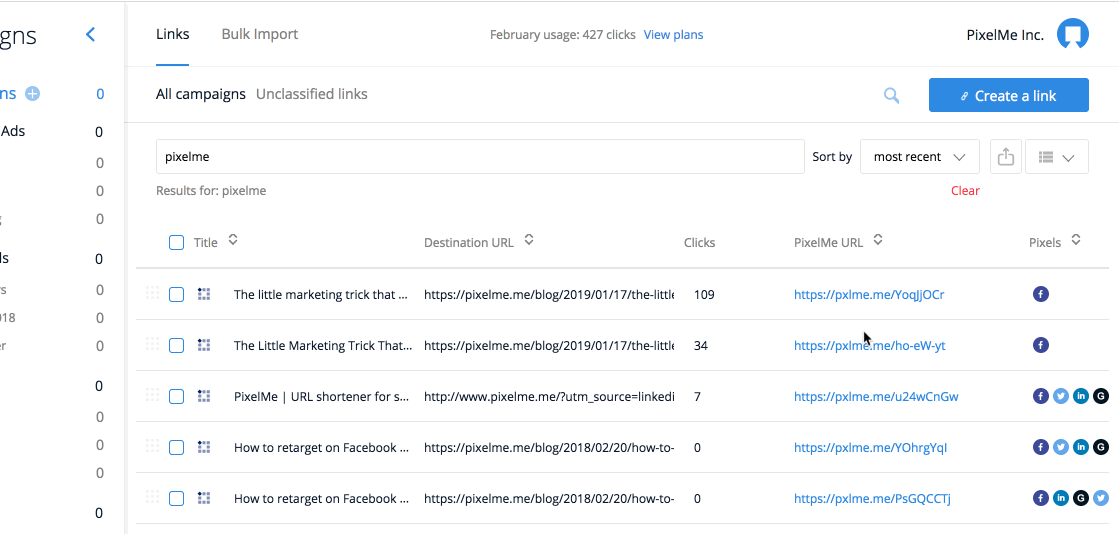
You can see the total number of clicks for each link, like this:
You’ll also be able to see the total number of clicks on all your links at the top of the dashboard.
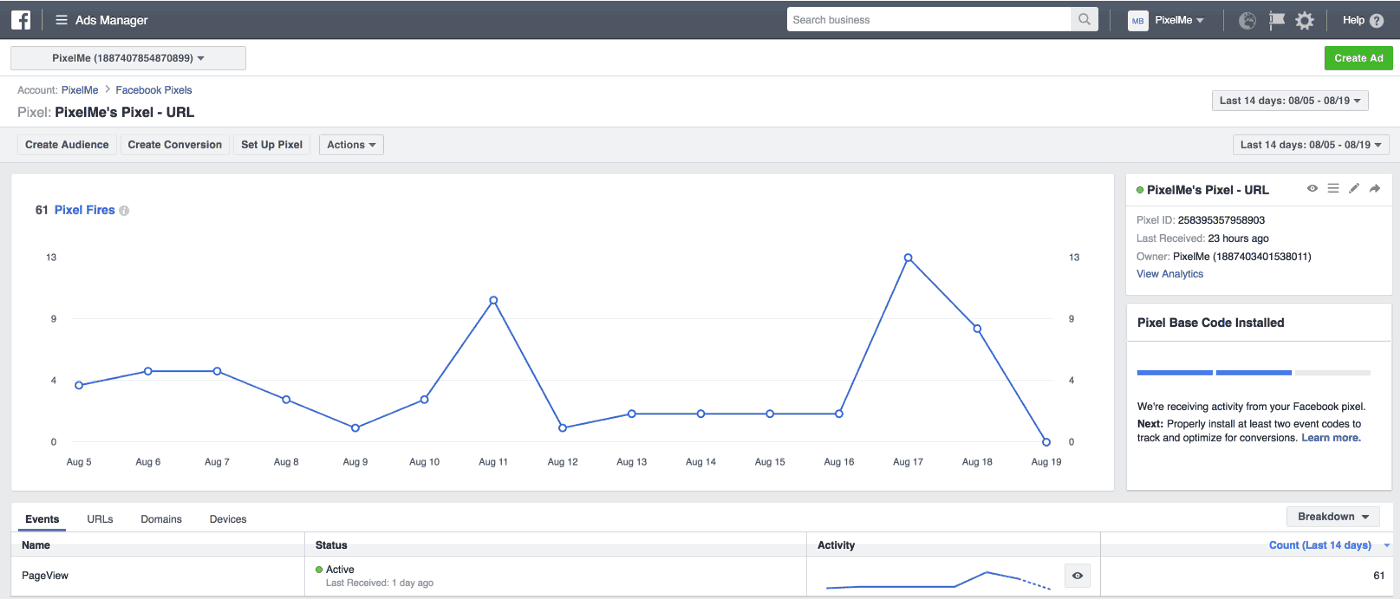
One thing to note is that it’s super important to find how big your custom audience is in Facebook directly.
In your Facebook Events Manager dashboard, you should be able to see your custom audience.
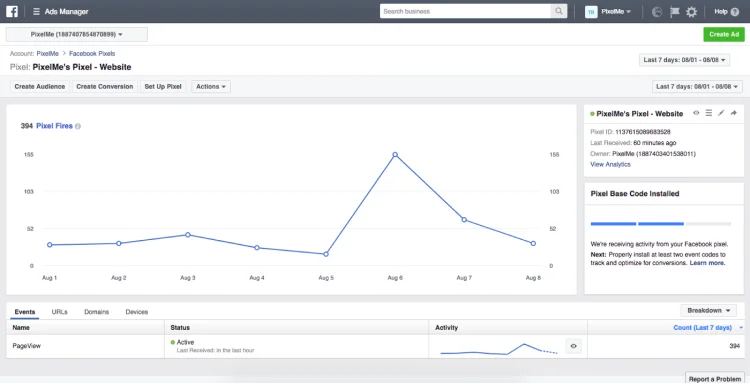
Having the number of clicks in PixelMe’s dashboard and the number of Pixel Fires in Facebook gives you an opportunity to compare both metrics. With PixelMe, you know the exact total number of clicks which gives you a pretty good idea of how your links perform and the total audience you can reach. With Facebook, Pixel Fires are your total “targeting audience”. This corresponds to the total number of people who clicked on your link and who have been identified by Facebook on their platform. In other words, this is the number of people who will see your ads in the next step 😁.
Step 4: Create your custom audience with all the people who clicked on your links
Are you seeing your pixel fires in Facebook? That’s a very good sign 👍. This means that you set up your retargeting pixel correctly, and you’re gathering people for your new audience.
After few days of sharing your link, you should have enough people to start creating a custom audience and launch your retargeting ad.
To do this:
In your Facebook pixel dashboard, click on “Create Audience” in the top left.
The next step is to filter your custom audience for all the people who visited a specific webpage. There are two options you can take. Either:
Select “URL” “contains” and type “pxlme.me”
Or, if you want to target users who clicked on specific links, you can set URL to ‘exact’ and put in the link(s) you want to use.
Step 5: Create Facebook Ads to retarget all the people who click on your link
Now that your custom audience is set up, let’s retarget that audience! In your Facebook Ads Manager menu, go to Ads manager in the top left of the screen. In the Ad Set tab, you can press the green ‘Create button’. When you’re making your new ad, you’ll have the ability to customize the Audience. If you click on ‘Create new’ and then custom audience, you should be able to see the list of all the custom audiences you’ve already created and the number of people each audience contains 😊.
Now you’re ready to create the rest of your ad. Continue the ad creation process and select the type of ad you’d love to run. If you’re looking a guide to creating Facebook ads, have a look at this awesome guide from Buffer 😃.
Want to try PixelMe, the URL shortener for savvy marketers? 👉 Start your 7 day free trial, no credit card required.